So you need Inverse Kinematics for your Character Rig
Here we’ll be going over what the bare minimum is for an Inverse Kinematic constraint in Blender - and then how to improve that a little bit so your character’s extremities can rotate independently of their parents.
Here’s a quick explanation on the main bits of your common Inverse Kinematic limb:
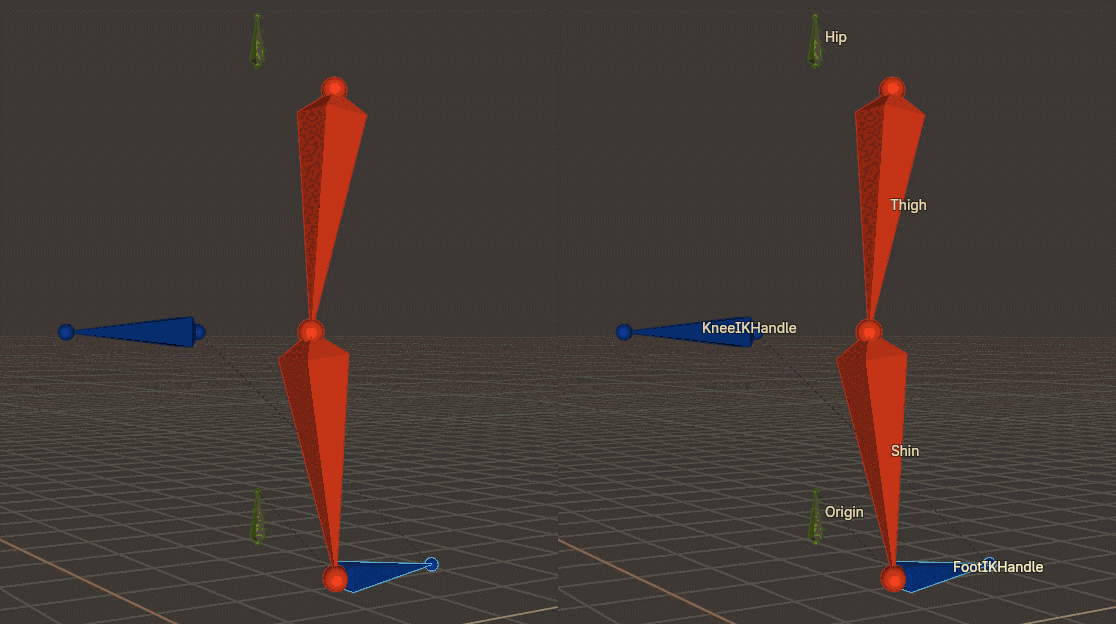
Origin bones are in green, Leg bones are red, IK bones are blue.
- Chain Bones: First, you must have at least two bones to make an IK chain. For this example, this is the Thigh and Shin bones in Red.
- IK chains work best when they are slightly bent in the direction they should bend beforehand. A perfectly straight line makes it VERY difficult for an IK chain to solve properly.
- IK Handle Bones: Second, you must have at least one IK Handle, but two is ideal. They are displayed here in Blue. The required one (the Base IK Handle) is the one the controls the IKs at the very end of the chain, FootIKHandle. The optional one (the Pole Target Handle) tells the IK’s middle joints where to point, but it’s so useful it may as well be required - and that would be the top IK bone, KneeIKHandle
- For your IKs to properly work, you must also note that the Blue bones CANNOT BE CHILDREN of the Red bones. Which brings us to the 3rd component.
- Parent Bones: Third, you must have two parent bones. One for ALL of the bones to parent to (the Origin bone for this example) and one for JUST THE CHAIN BONES to parent to (the Hip bone for this example)
- Our Blue bones are going to be childed to one of these Green bones. I’ll explain more later.
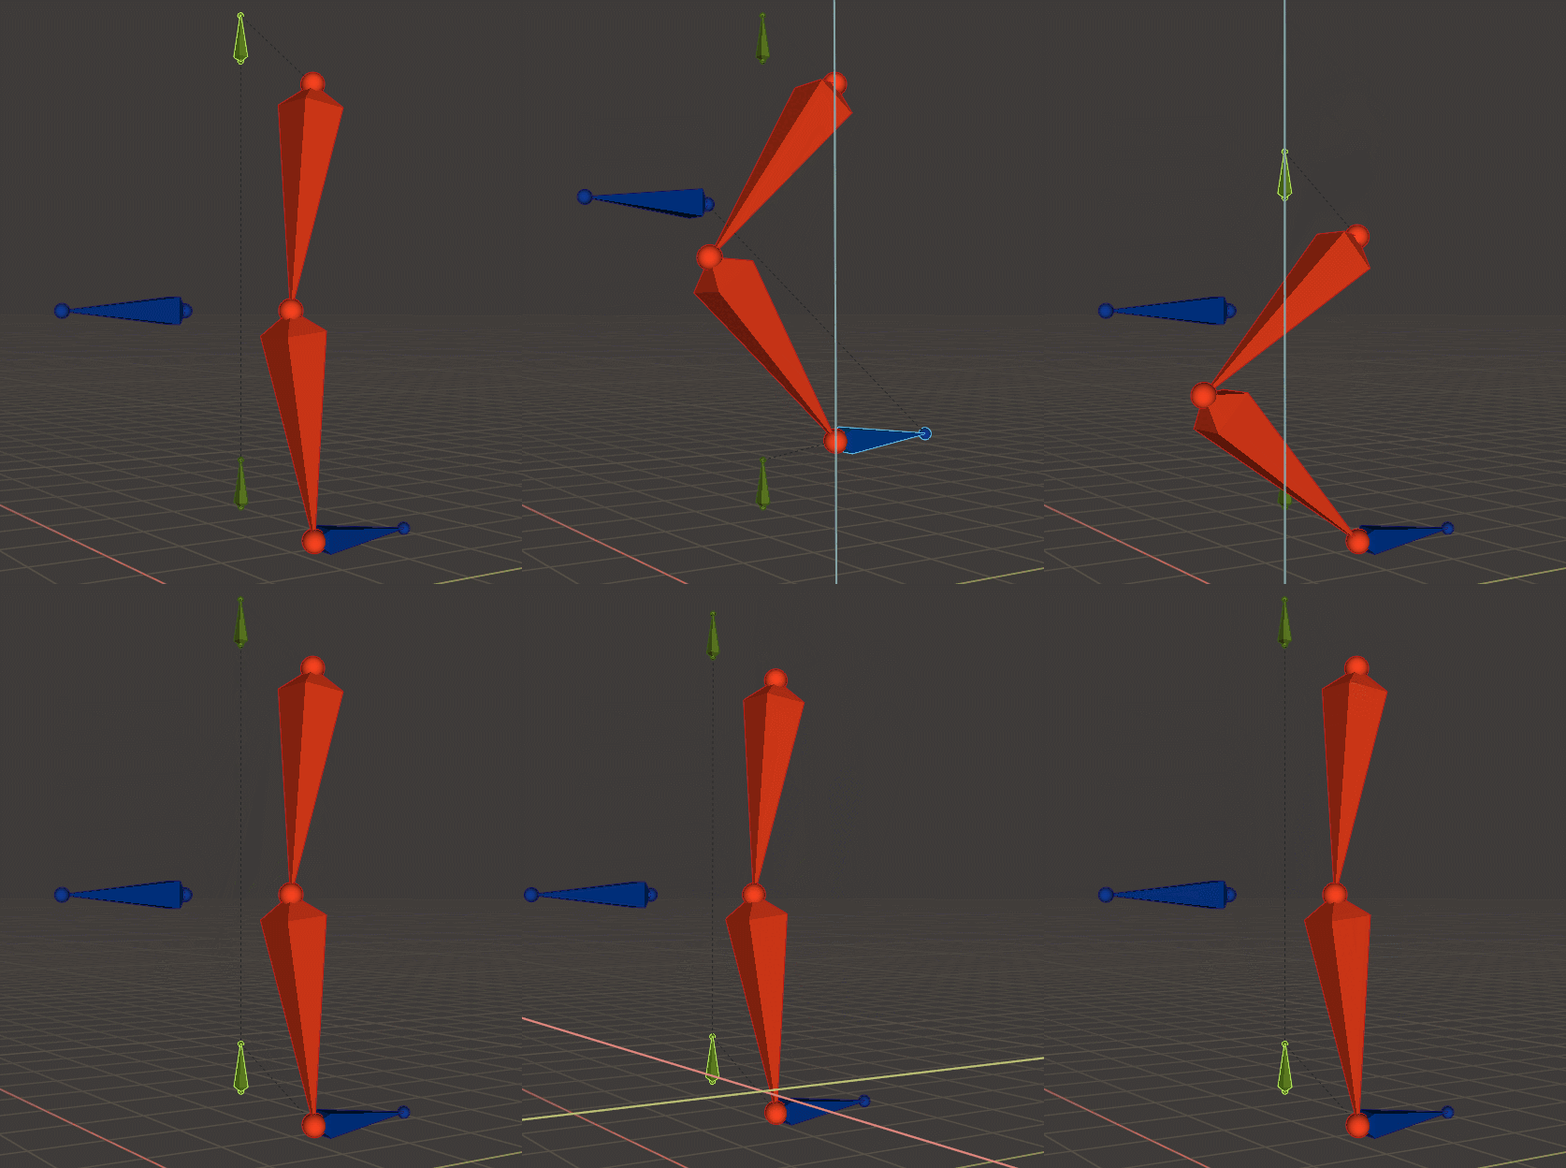
When properly set up, you should be able to move the IK Handles to affect the whole chain, and you should also be able to move Parent bones to either affect just the Chain bones OR the Chain AND IK Handles
Setup Part 1: Adding IK handles to your Rig
Okay, so assuming you already have a skeleton and/or know how to set up one - how do you add IK bones to your skeleton?
The Base IK Handle
Add a Base IK handle to the end of the bone chain by selecting the end of the bone and Extruding (shortcut E in Edit Mode) a new bone out. Traditionally, I usually extrude in the -Y direction, but you can send it in any direction you please. Don’t forget to rename your bone to something memorable!
This bone’s origin point needs to be the same as the end point of the last bone in your chain. HOWEVER, you still need to give it a different parent. Do this by going to the Bone tab with your new bone selected, unchecking Connected, then setting its new parent.
The parent bone we should choose for this bone should be a bone higher in the hierarchy than the parent of your IK Bone Chain. That means for our example our IK Chain’s parent is Hip, so we will set our IK Bone Handle’s parent to Origin.
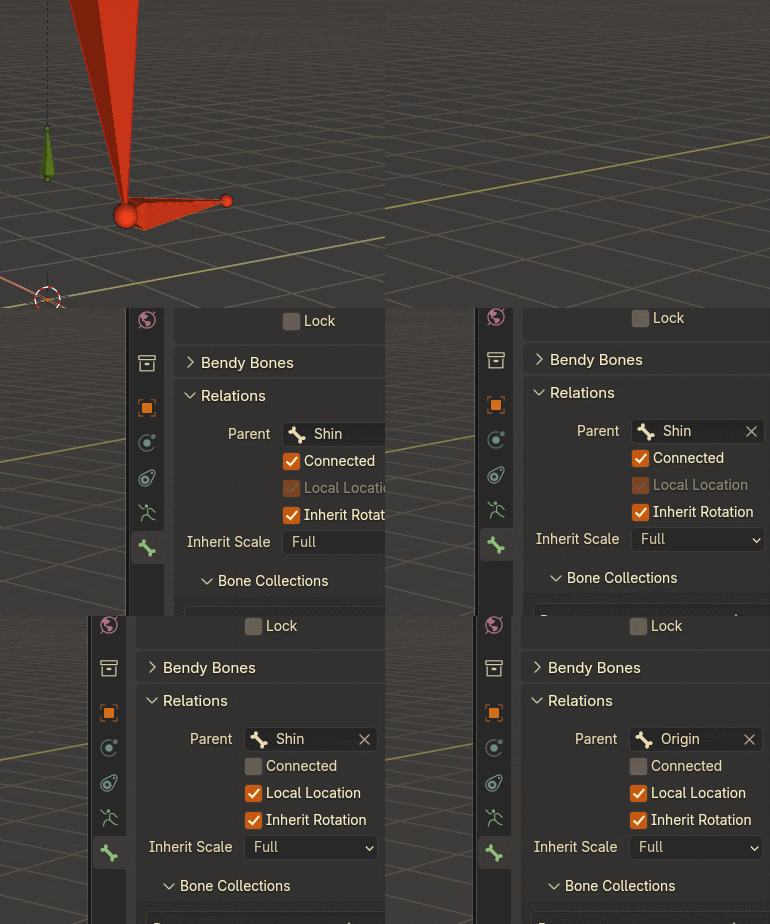
The Pole Target Handle
In the same way what we’re going to do is extrude the Pole Target Handle from the center of our IK Bone Chain. Unlike the other Handle, we don’t want it to share the EXACT same spot as the bone that will be using it as a target - we want it to be a bit farther forward. It will make the IK much easier to use.
Make sure to Uncheck Connected and then reset the Handle’s parent when you create it! This is an IK Handle, so it too should be childed to a a bone that is higher in the hierarchy than the IK Bone Chain’s parent. In our case we could also parent this bone to Origin, but as a shortcut in my case I usually child it to the Base IK Handle since it makes coordinating rotation a bit easier. It does introduce other problems, but like with anything there are pros and cons. Feel free to child your Pole Target Handle to either.
In my example, I set mine’s parent to FootIKHandle
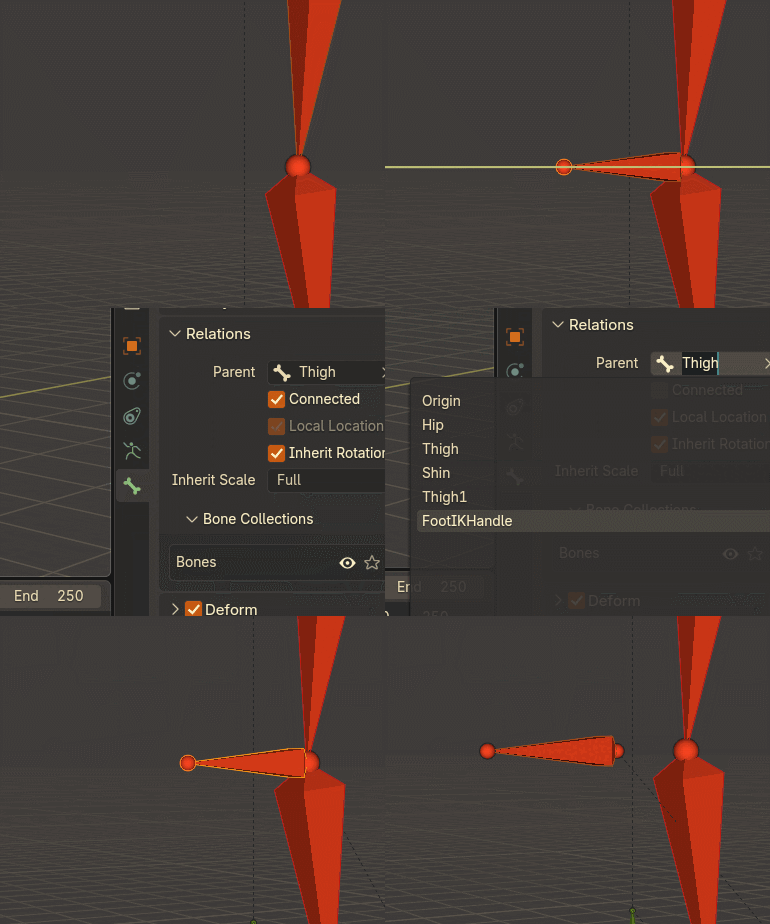
And with that, we’re done setting up the basic handles you’d need for IKs. Now we actually set up those IKs.
Part 2: Setting up the IK Constraint
Select your Skeleton and set it to pose mode, then select the end of your IK Bone Chain. In our example, that would be Shin. Go to the Constraints tab on the right and add an Inverse Kinematics constraint
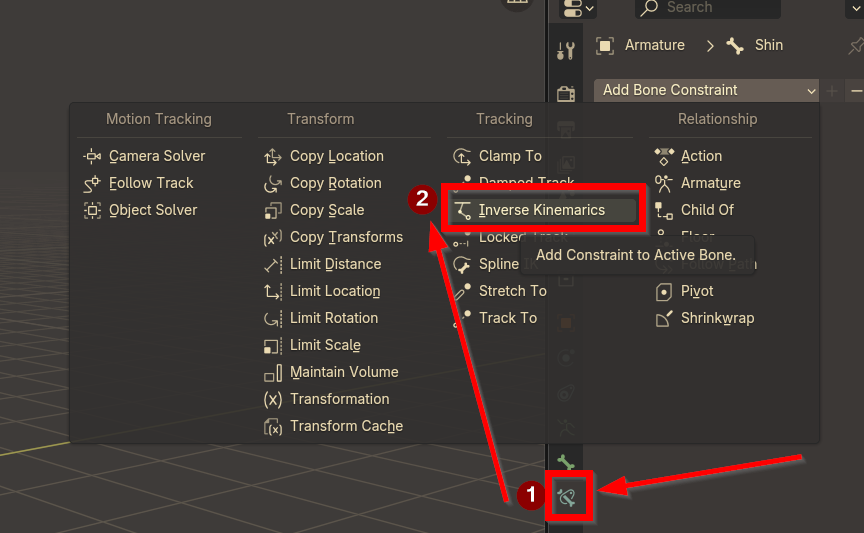
Here’s a properly set up Inverse Kinematic constraint. Take a look first, and then I’ll explain what’s going on here.
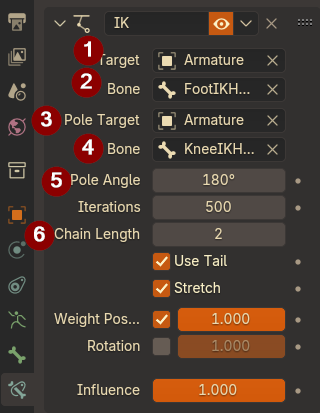
Before we start, Note that Target and Pole Target will extend to show Bone selection after you select your Armature. Without anything selected, numbers 2 and 4 will not exist.
- Target: Surprisingly, this is not a bone but a Skeleton. The Armature you select here doesn’t even technically have to be this armature, you can have it set to a completely different skeleton. However, since we are planning on building all of this with our own skeleton, select the skeleton your IK Bone Chain is attached to.
- Target Bone: This is the IK Handle at the end of your IK Bone Chain. In our example, that would be
FootIKHandle. - This is the same Armature as #1. Essentially, you’re just choosing the parent of the bone that you will be using. Since all of our bones are in the same Armature, it makes sense to choose the Armature our current IK bones are within.
- Pole Target Bone: This is the bone that the chain will use to determine what direction the chain should face. In this example, the bone to pick would be
KneeIKHandle - Pole Angle: If your joint ends up facing the wrong direction, use this Pole Angle to face the joint towards your
KneeIKHandle. For me, I had to set 180 degrees to make it work. - Chain Length: The amount of bones in your IK Bone Chain. Your average leg or arm has 2, but sometimes other limb types can have more. We’ll be using 2 for this example.
And with that, you’re done! Enjoy your Inverse Kinematic limb. These same rules should also apply to Arms as well, just rotated 90 degrees.
Part 3: Making Feet or Hands that rotate with your IK Handle
Okay, here’s the part where we make extremities that can rotate without caring about their parent bones’ rotations.
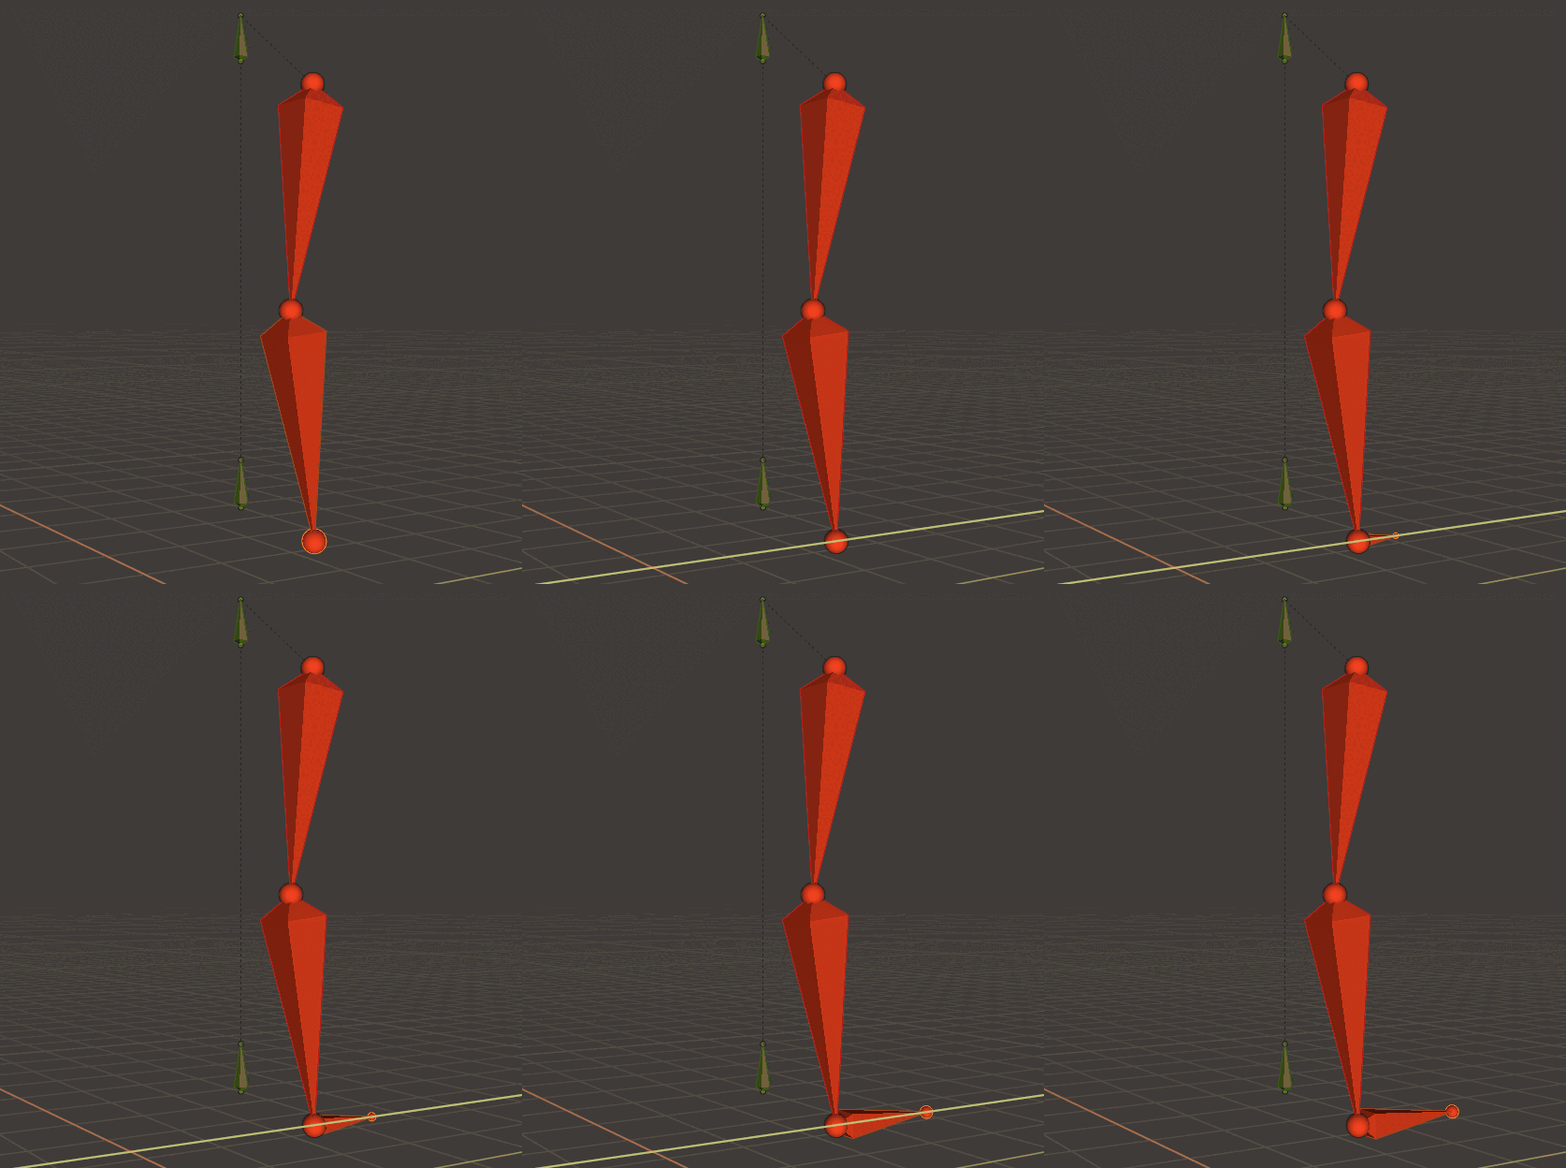
Say we have added feet bones to our leg here. Normally, one benefit of using IKs is that things like hands or feet can stay perfectly in place with the same rotation and position while their parent bones adjust to accommodate that.
However, our current setup….
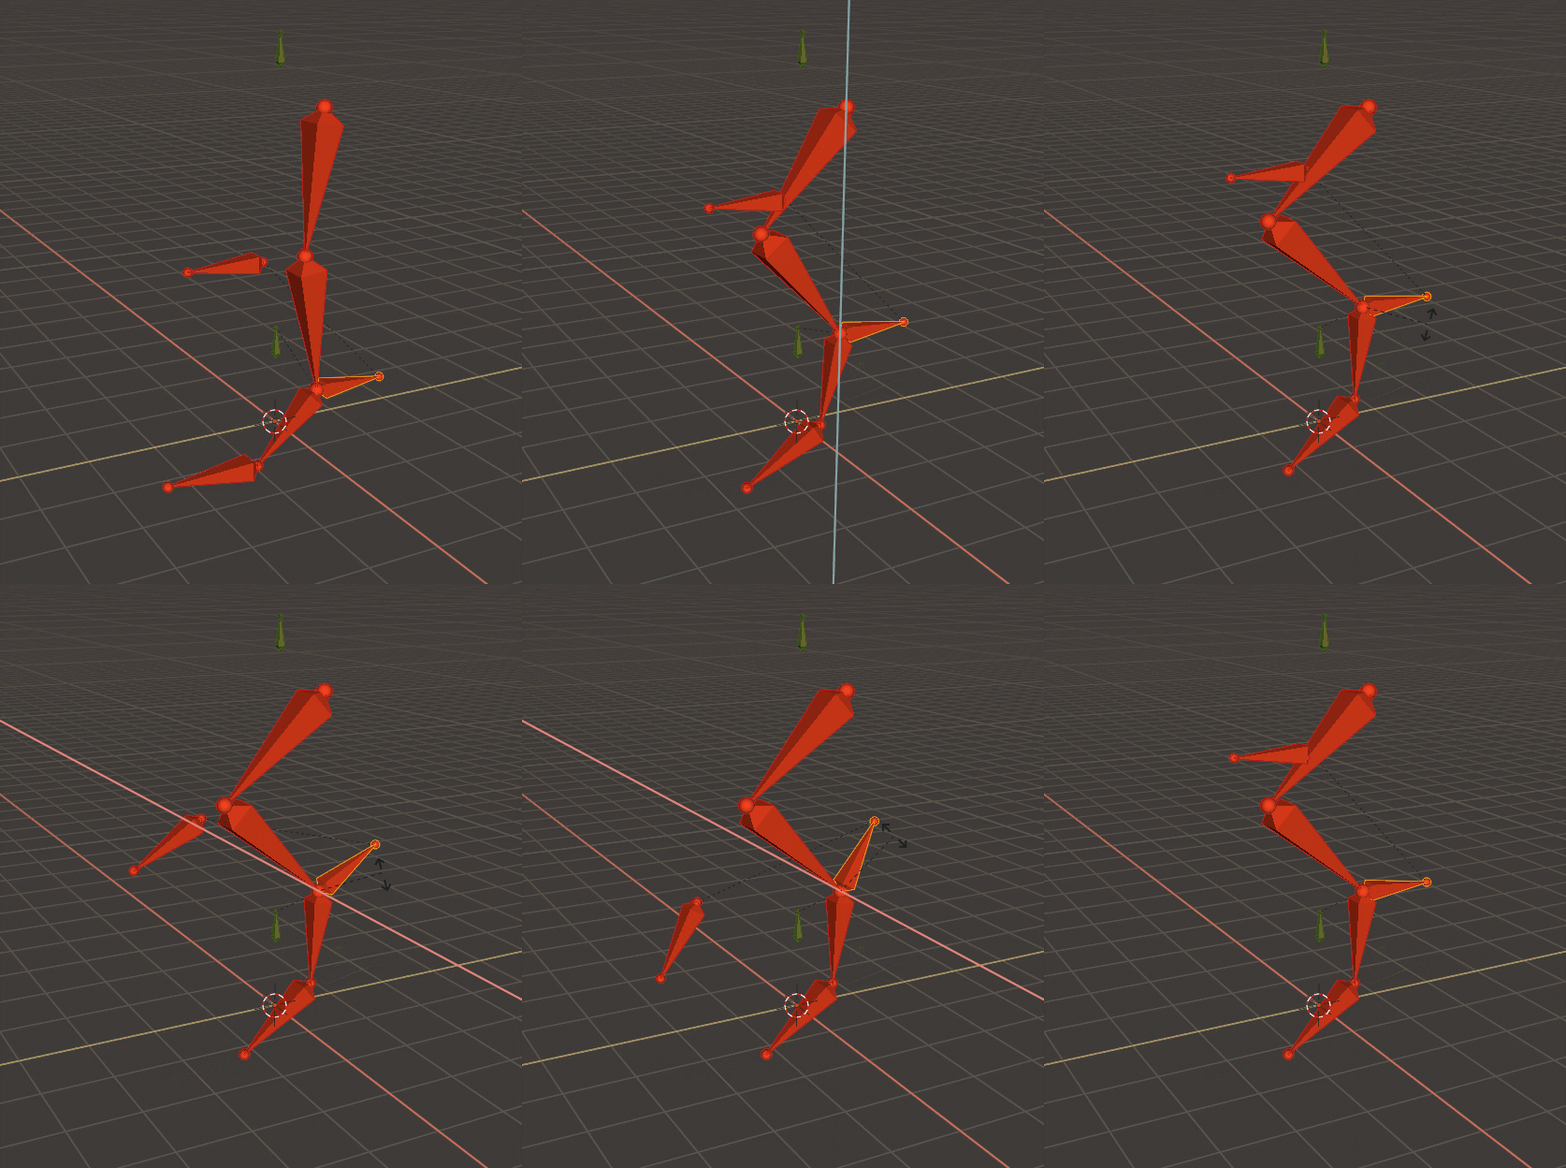
…does not do that. So how do we fix it?
The Strategy
To explain how we’re going to fix this, we’ll have to do 3 things:
- Create a Clone of the Foot bone.
- Child that Foot Clone Bone to the Base IK Handle while keeping it in the exact same position
- Creating a “Copy Rotation” constraint on the Foot Bone to copy the rotations of the Foot Clone Bone.
So in this way, our Foot bone will now be able to rotate with our Foot Clone. But that’s still a little confusing, right? Let’s look at what’s happening with a mostly-complete example.
Here, I have my Foot Bone using a Copy Rotation constraint pointed at my Foot Clone Bone (the teal colored one), which is a child of my Base IK Handle. But my actual IKs are disabled, so you can see them separately.
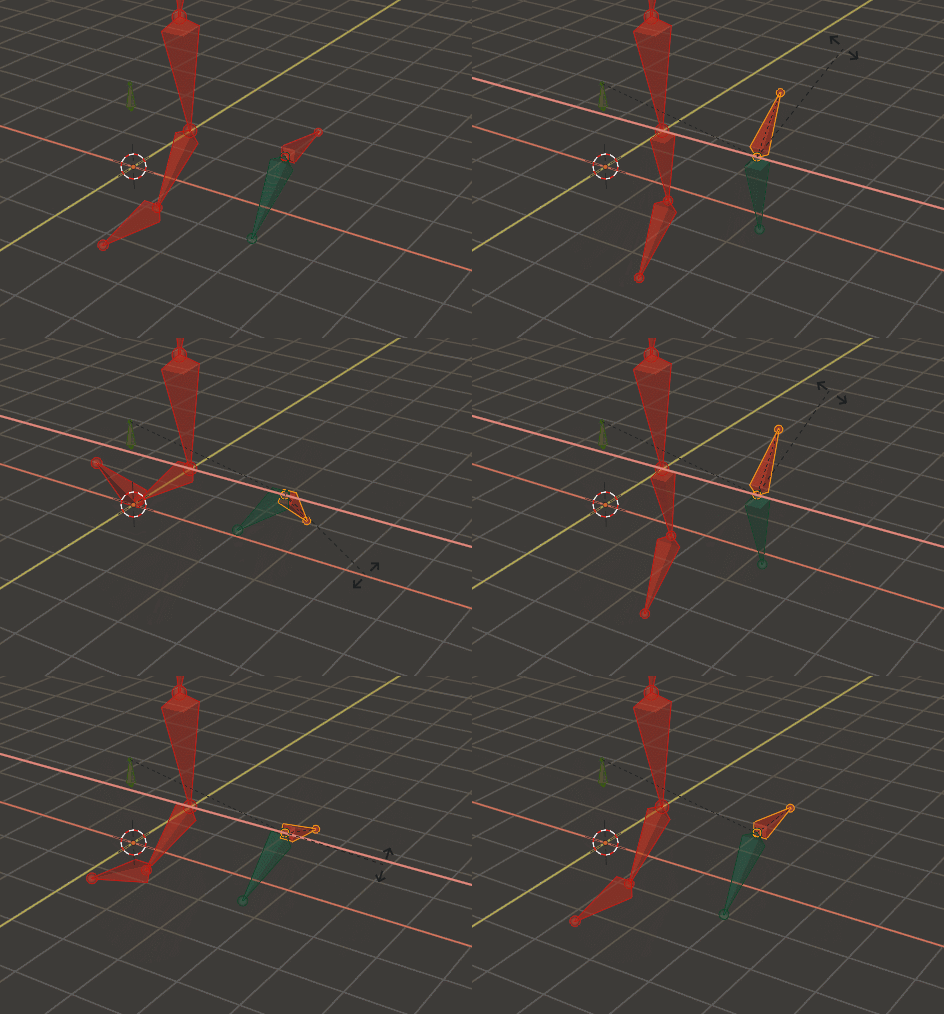
See how the Foot Bone on the left matches the rotations of the Foot Clone Bone on the right? With the actual IK Constraint also active, this allows the normal Foot Bone to follow the rotations of the Base IK Handle while also sharing its position.
So, let’s set this up.
The Execution
Click on your Foot Bone in edit more and use Shift+D (or use the Search F3) to Duplicate the bone. Don’t move it! Just press Enter without moving the mouse.
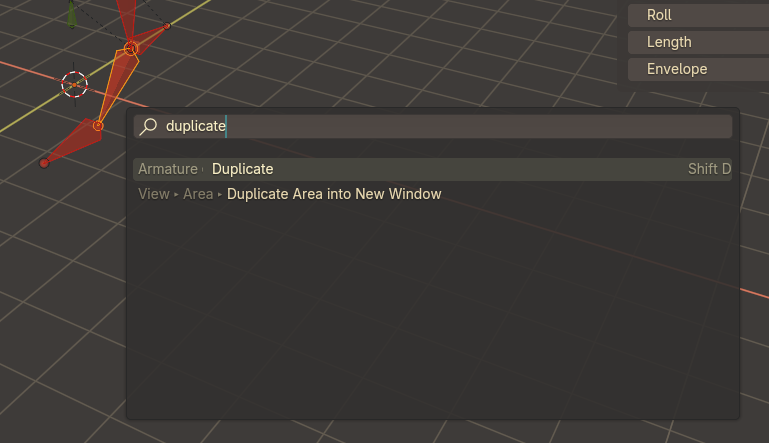 Leave it where it is and rename it to something nice using
 F2, like Foot Bone Clone. We’re going to turn Connection off in the Bone Panel and Child it to the Base IK Handle FootIKHandle.
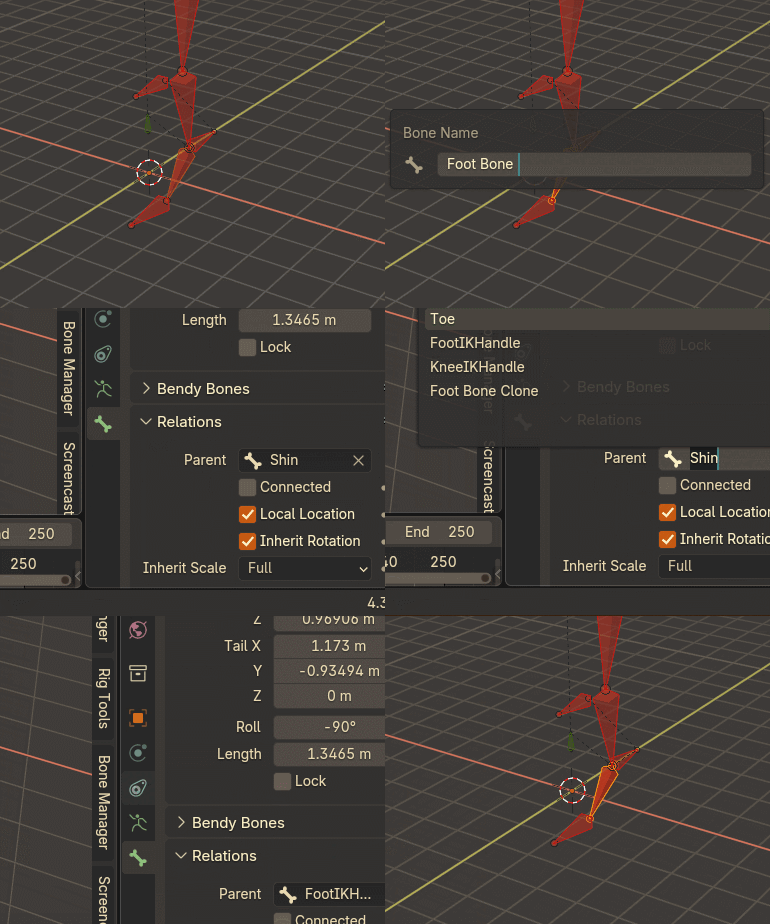
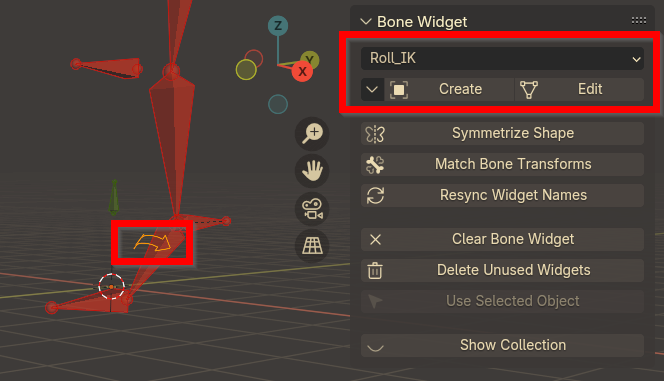
You can recolor it or make it unselectable or otherwise change it cosmetically to make it easier to understand which bone is the original and which bone is the clone. I used Bone Widget in Pose Mode to create a new Shape for it so that while it occupies the same space, it’s easy to tell which is which.
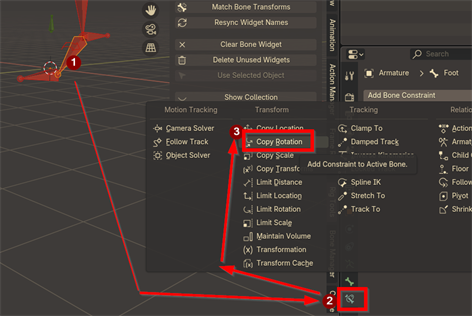
While in Pose Mode, click on your original Foot Bone and head to the Constraints tab.
After that, we just set up the Constraint like we’ve set up the rest.
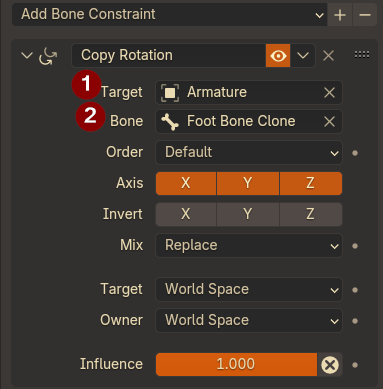
- The Target Armature is our basic armature that we’ve been working in.
- The bone we’re aiming at is the Foot Bone Clone.
And like that, our rotational edits are now complete!
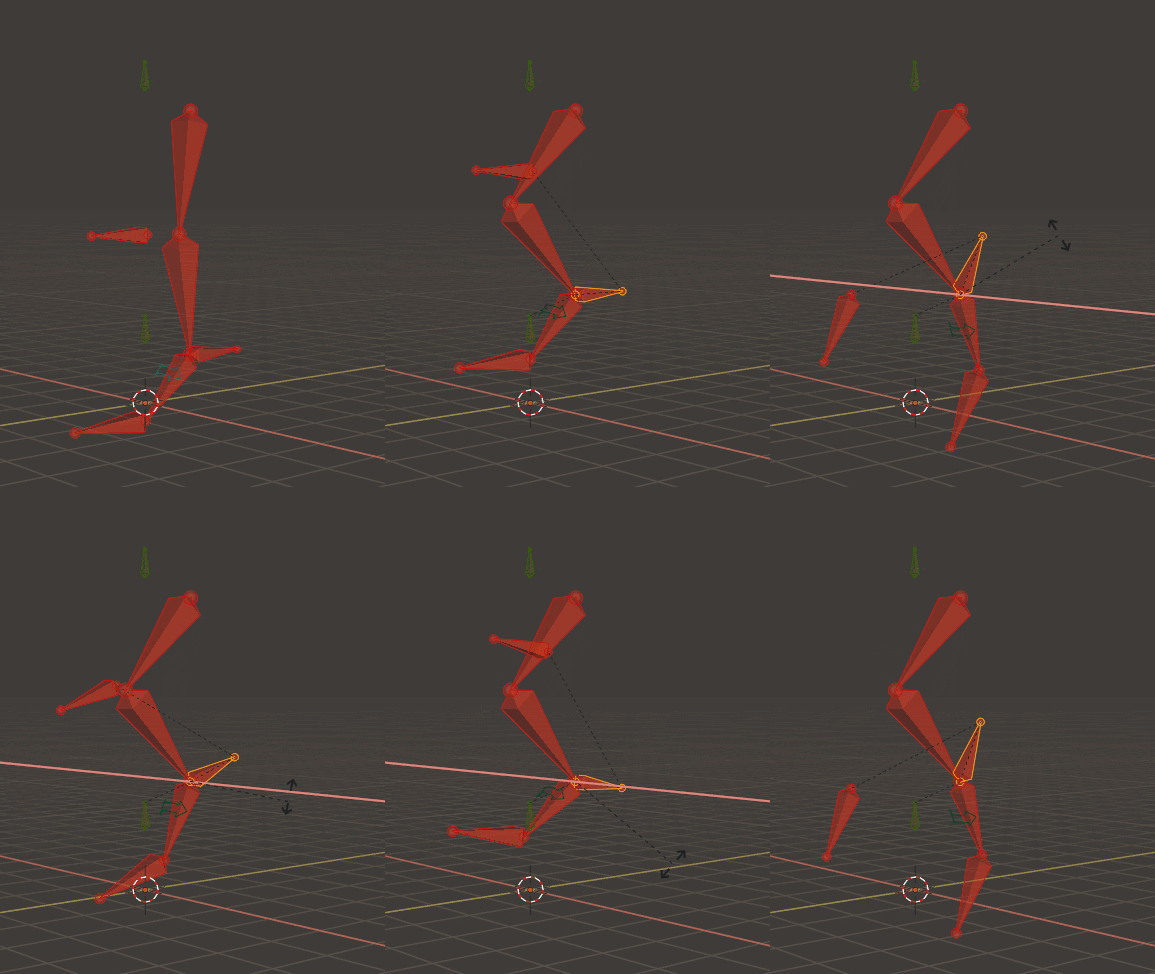
Closing Notes
Other things to try
If you want an even more advanced setup, try adding Copy Scale to the constraints as well! Or remove both and use Copy Transforms! This will allow you to scale the Handle to scale the foot or hand as well.
The same techniques should be usable for any limb, or even things with more joints like tails.
Things that could still be improved
This IK setup does NOT include any methods of Forward Kinematic rotation. If you ever want to rotate your IK chain like how you would with normal bones….it’s a bit tricky. I’ve found a few methods, but none of them are really great.
Here’s a tip for that though:
If you select your Hand IK and then the bone you’d like to rotate in the IK Chain and change your Transform Pivot Point to Active Element, you technically can get FK rotations with an IK chain.
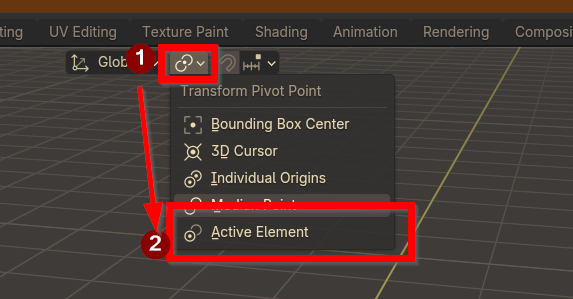
It’s not the best workflow, but it IS a stopgap.
Hope this helps!
- Spex130